-
 Help Center >
Artist: LiveStream Setup Help
Help Center >
Artist: LiveStream Setup Help
Artist: LiveStream Setup Help
Sections in this article:
LiveStream SoundcheckLiveStream: How to Use ManyCam For Your Show!LiveStream: On a Phone or Tablet Using LarixLiveStream: With a Pre Recorded PerformanceLiveStream: Mac Users Only. Send DAW Master Audio Output to OBS with BlackHoleLiveStream: MAC Users Only. Install BlackHoleLiveStream: Frequently Asked QuestionsLiveStream: Performance Tips & IdeasLiveStream: Options on making it the highest qualityLiveStream: How Does Payment Work?LiveStream Soundcheck
One of the great things about our LiveStream platform is that we walk you through the whole process during set up, instead of sending you to another website. We incorporate instructions within our LiveStream platform, or we link to one of our own help articles so you never have to leave the site.
When you book a livestream with us by default we give all artists 10 minutes for sound check which is almost double the amount of time that most of our artists need in order to properly test for their upcoming stream.
- By Default the artist gets a 10 minutes soundcheck
- When an artist reaches gets 1-10 tickets sold for their event that time doubles to 20 minutes.
- When the artist gets 11-20 tickets sold that amount of time goes up again to 30 minutes.
We have to cap sound check time because we are charged by the minute even if an artist never does a LiveStream.
We recommend right after setting up your LiveStream show heading to the Tech Rider within your account and filling that out as well. Once you are finished you will be taken to the Sound Test (Soundcheck). We recommend getting that out of the way first thing so that you are confident with your set for your upcoming stream.
Following the sound check you can go ahead and start promoting the show. That way, once at least one ticket is sold you can always head back into your account and do some more testing if you want.
If any questions come up along the way please feel free to reach out to your booking rep or email Booking@Myafton.com
Enjoy your show!
LiveStream: How to Use ManyCam For Your Show!
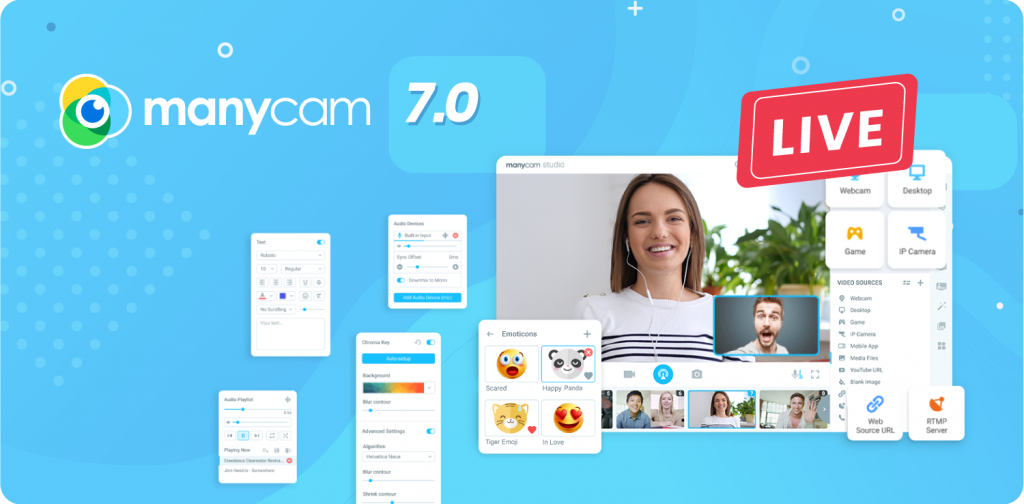
ManyCam
If you are looking to bring your LiveStream show to the next level you can do just that using ManyCam which gives you the ability to add multiple camera angles to your live show!
How To Set It Up
- First you will need to head HERE to download the program (NOTE: you will need to purchase a license for the program if you want to use the full features of the program but you can always try it out for free first with their 7 day free trial).
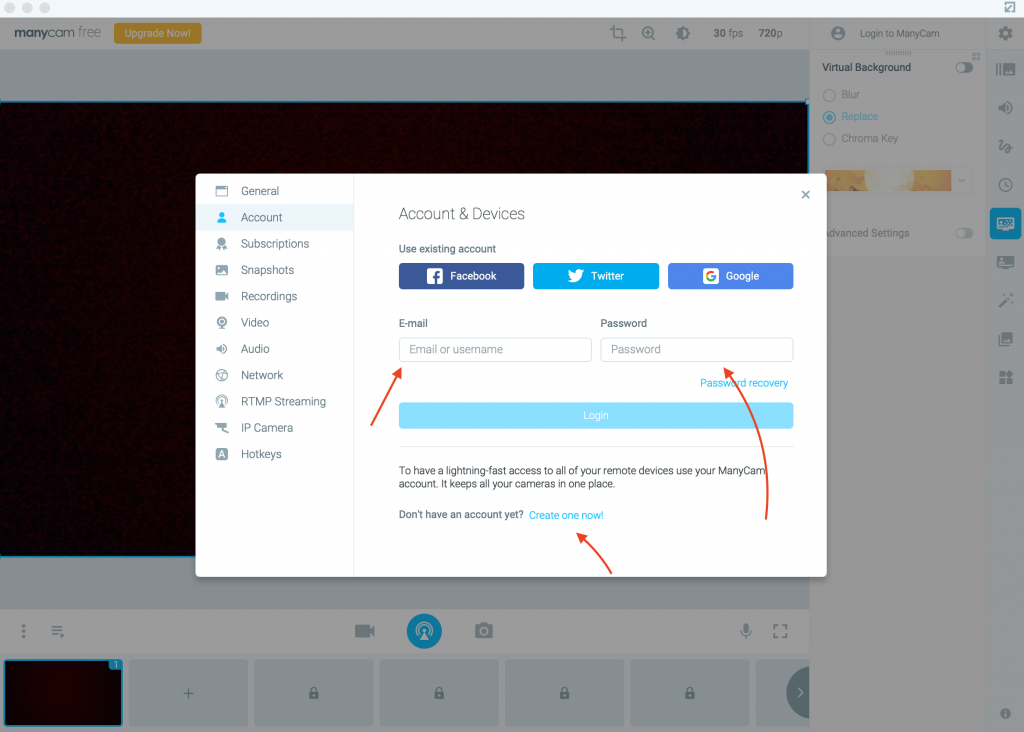
- Once you have it downloaded open it up and you will either need to login (if you have an account) or click ‘Create One Now’ (if you do not net have one).
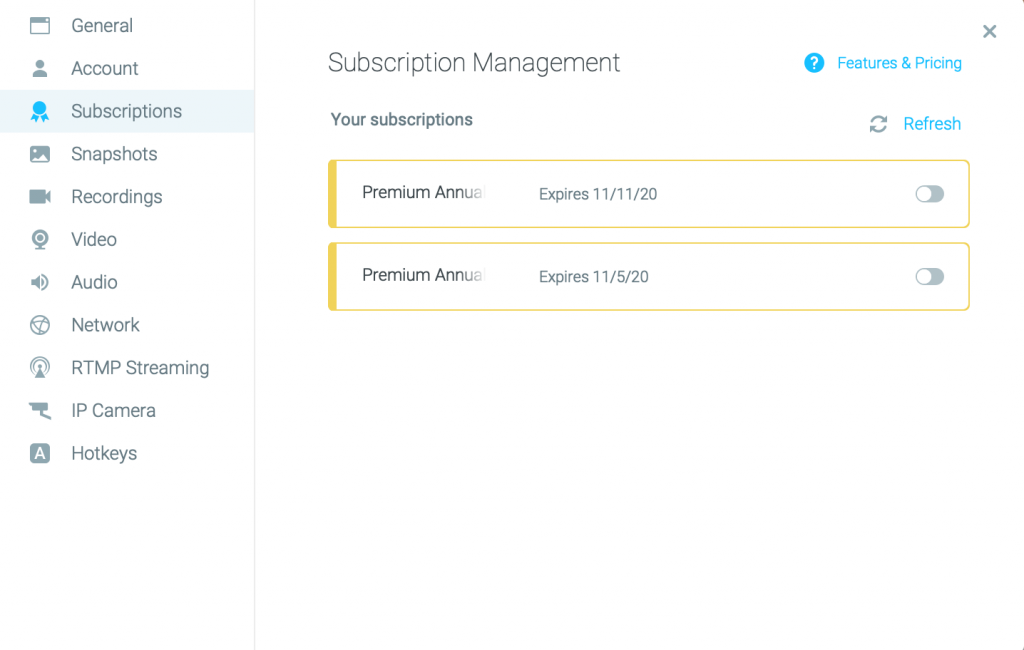
3. (If you did get the full version of the program follow these steps. If not then skip to step 4) Once you are logged in head over to subscriptions on the left of the page. Then make sure that your subscription is activated.
4. Then on the bottom of the page click on one of the + buttons. Then you will need to select the source of your second device video feed (in my case I will click on mobile device since I am using my phone).
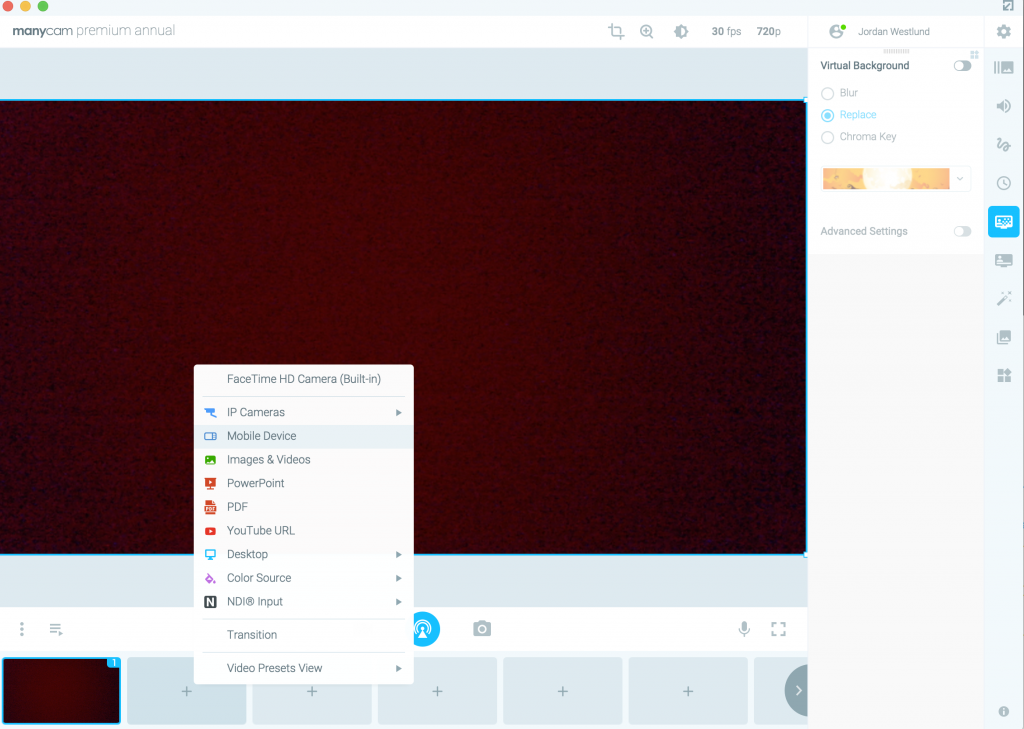
5. Next you will see the below screen but you will only see the device that and it is the one that you are using.

6. Now you will need to head over to your other device and go through the same process. Download the program, install it and login. Once you have done then you will now see your original device AND the new device that you just registered (NOTE: if you do not see the device listed just hit the ‘Refresh’ button in the bottom right hand corner of the window.).
7. Then just click on the device and click ‘Connect’ at the bottom
8. You should then see a preview of two different feeds at the bottom of the program (as shows below).
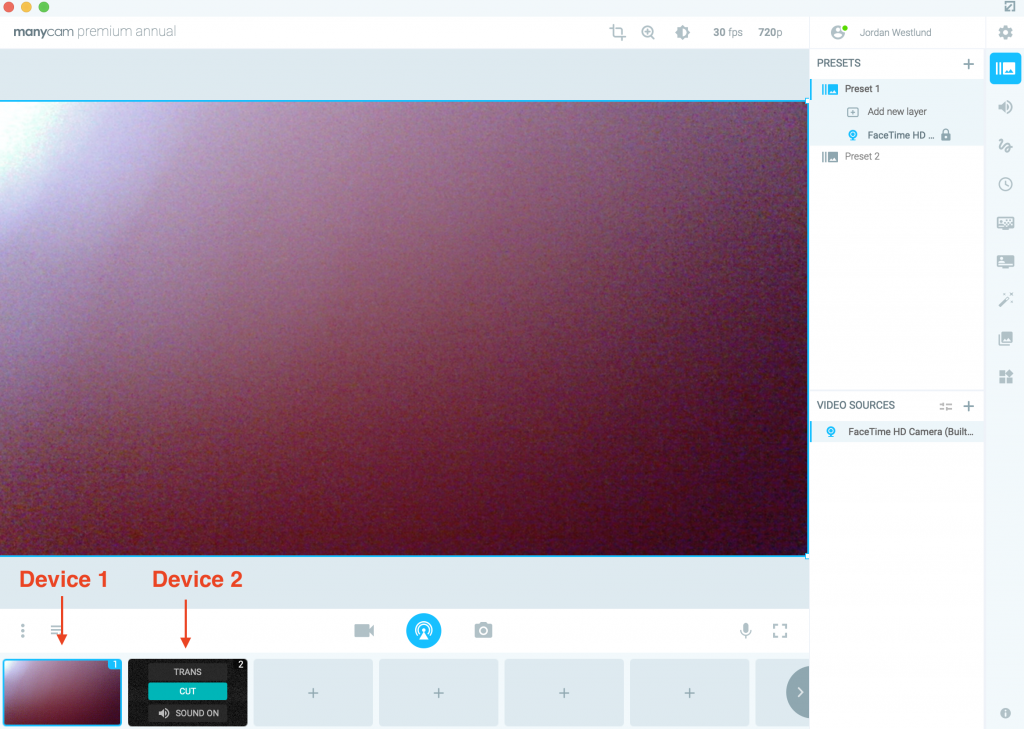
9. In order to switch between the two feeds during your show you just hover over one of previews and click on either ‘Trans’ or ‘Cut’ (as show above).
10. Once you have everything setup the way that you want it and you are ready to stream just click on the big blue button on the bottom middle of the page.
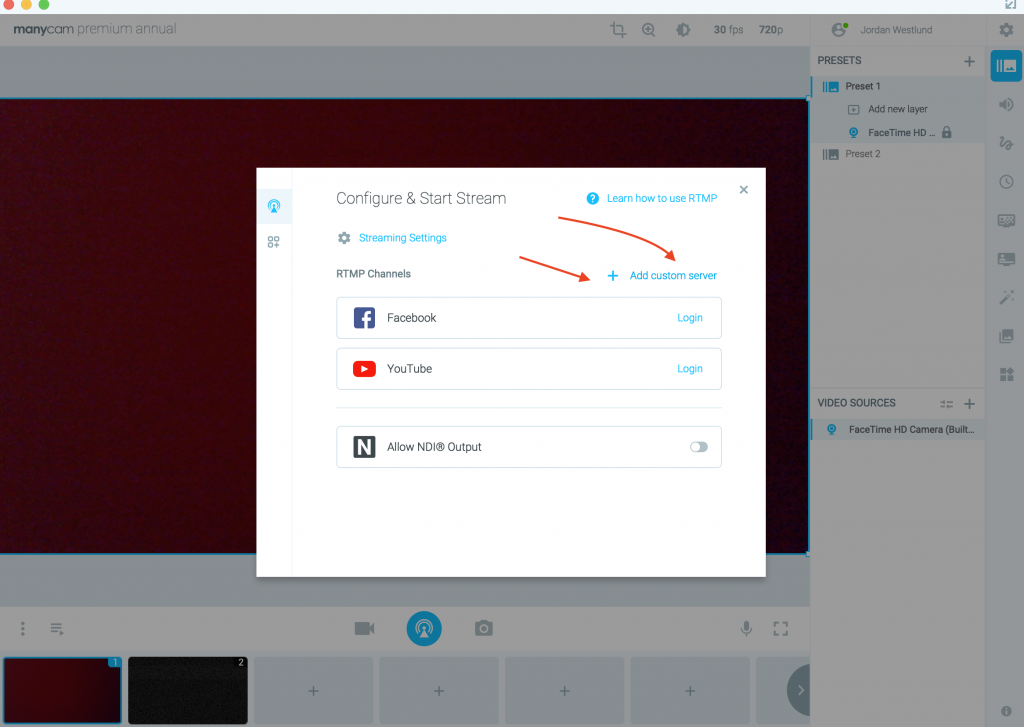
11. Then you will need to click on ‘Add custom server’ (in order to connect to the Afton LiveStream Platform)
12. Then Just make sure to label your stream whatever you wish and paste in the Stream URL and Stream Key that you receive from your MyAfton account.
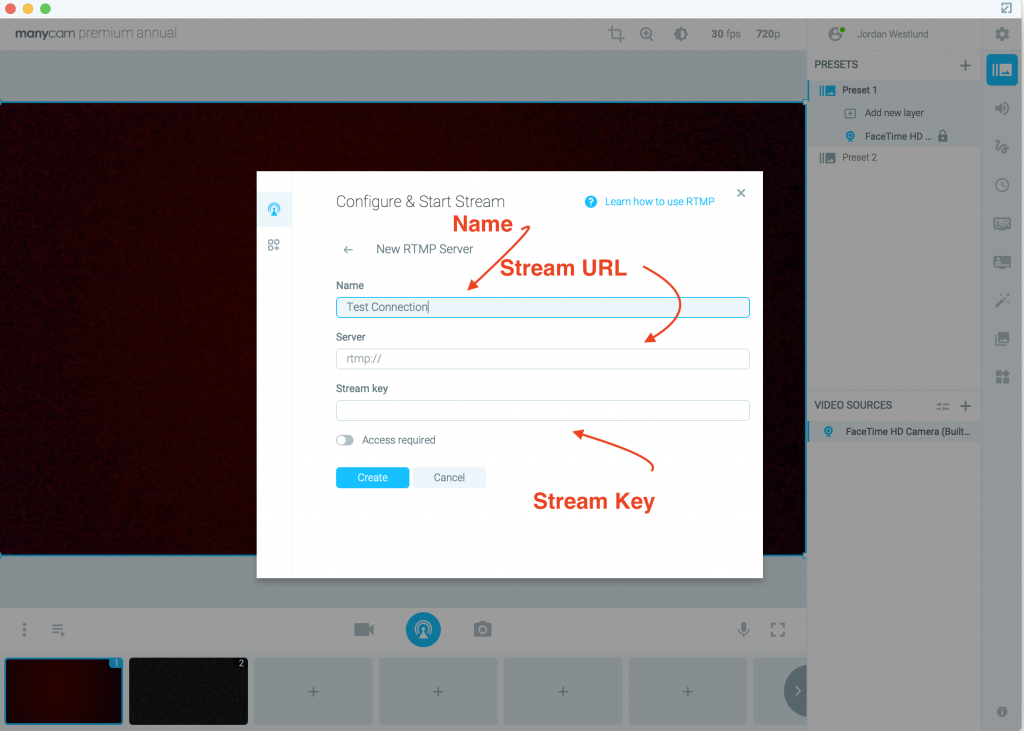
13. Once you are done entering in all of that info just click the ‘Create’ button and you will be all setup!
If any questions come feel free to email us at Booking@Myafton.com
Enjoy the show!
LiveStream: On a Phone or Tablet Using Larix
Larix Background
Larix Broadcaster allows streaming video and/or audio live content from your mobile device in real-time over WiFi, EDGE, 3G, LTE and 5G. As of now we recommend using OBS for your LiveStream show, however if you do not have a desktop or laptop computer you will not be able to use OBS. So we recommend that you use Larix for your LiveStream.
The only real limitations that we have found so far with using Larix are that you are not able to message your fans during your show (unless you are using an Android device). You can always message your fans before and after your set, but because of Larix’ limitations you cannot switch between separate apps while you are streaming. If you do this then it will pause your stream, so we do not recommend it.
So today we will be walking you through how to use Larix to stream through our platform.
Downloading Larix
First you will need to head HERE if you are on an IOS device (iPhone or iPad) OR click HERE if you are an Android device to download the Larix App. Once you have it downloaded you will then just need to open up the app.
Setting Up Your Afton Account
Once in your Afton account you will need to head to the Tech Rider and fill out the questions as you see below (since we do not yet have the modifications live on our site for using phones and tablets we have to use a work around).
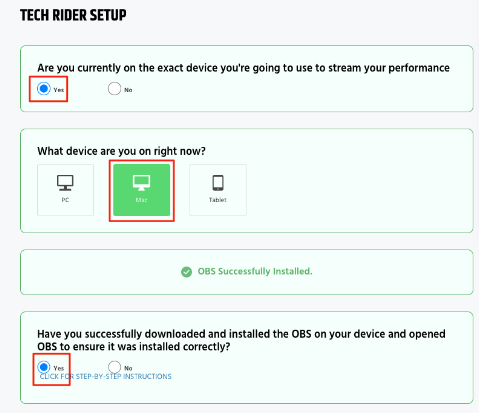
Even though you are not using OBS you still need to click yes that you have downloaded it to get to the next section.

Then you will need to click on Test LiveStream within your account if it does not automatically take you to it.
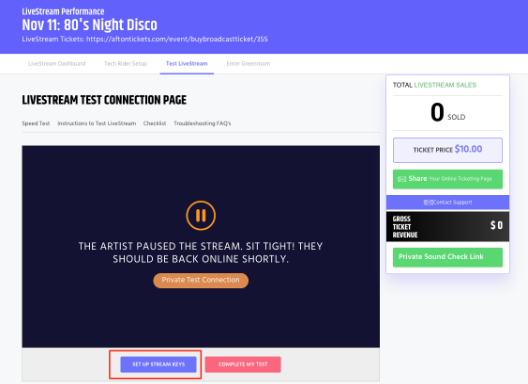
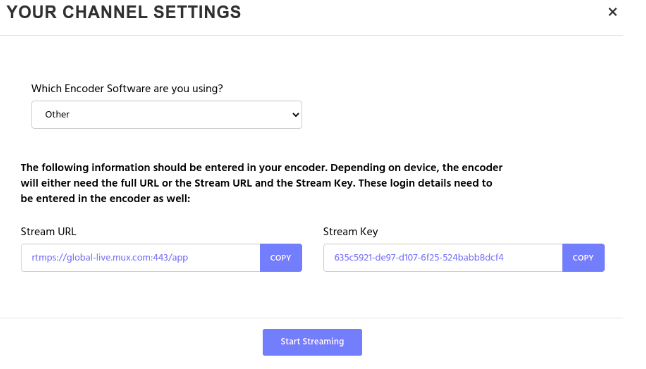
Next you will need to click the drop down menu at the top of the dialog box that opened when you clicked on Setup Stream Keys. And from there select Other. The just click on the copy button on Stream URL.

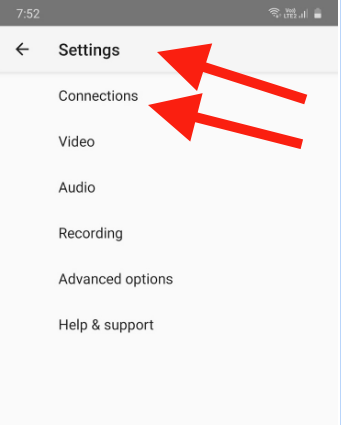
Once you have the Stream URL copied then you will need to open up Larix again. Open the Larix Mobile application and click on the gear icon in the top left.
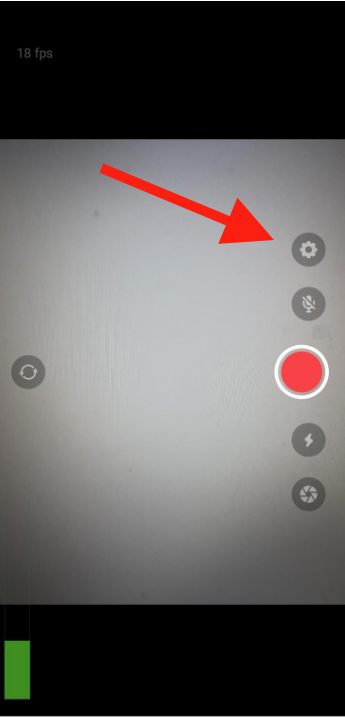
This will open up the Settings Page. Click on the Connections.
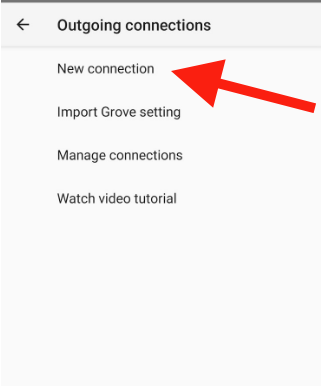
In the connections page a new connection can be added by clicking on New Connection.
In the new connections page past your stream URL that you copied from before.
*Make sure to first paste in the Stream URL and then at the end of it add a Forward slash / and then without adding any spaces paste in the Stream Key, so that it looks like the below image.
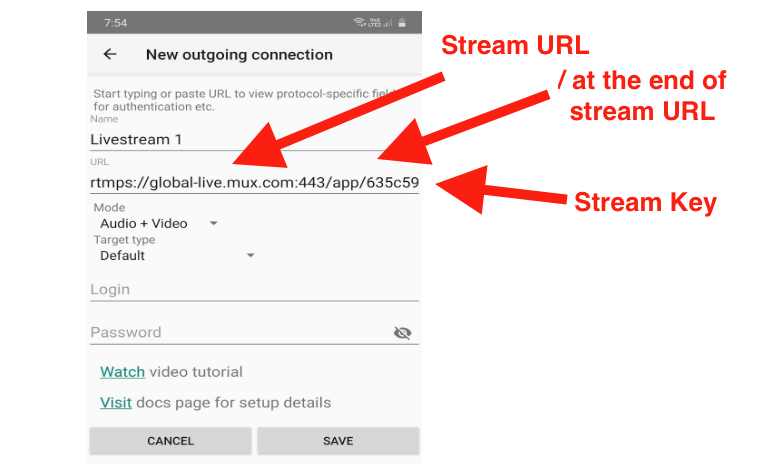
You can leave the login and password black and then click on the above Save Button and go back to Screen 1. Clicking on the RED record button will start to stream, so click on that.

Then head back into your Afton account and click on Start Streaming.
Now after about 20 seconds your stream should start displaying within your Afton account. You are all set! Enjoy your show!
LiveStream: With a Pre Recorded Performance
How to Add a Pre-Recorded Video to Livestream
Start off by opening up your OBS program (if you do not already have OBS installed you can head to this help article for full info on that.
(NOTE: If you don’t want a thumbnail image for your performance you can skip down to VIDEO SETUP.)
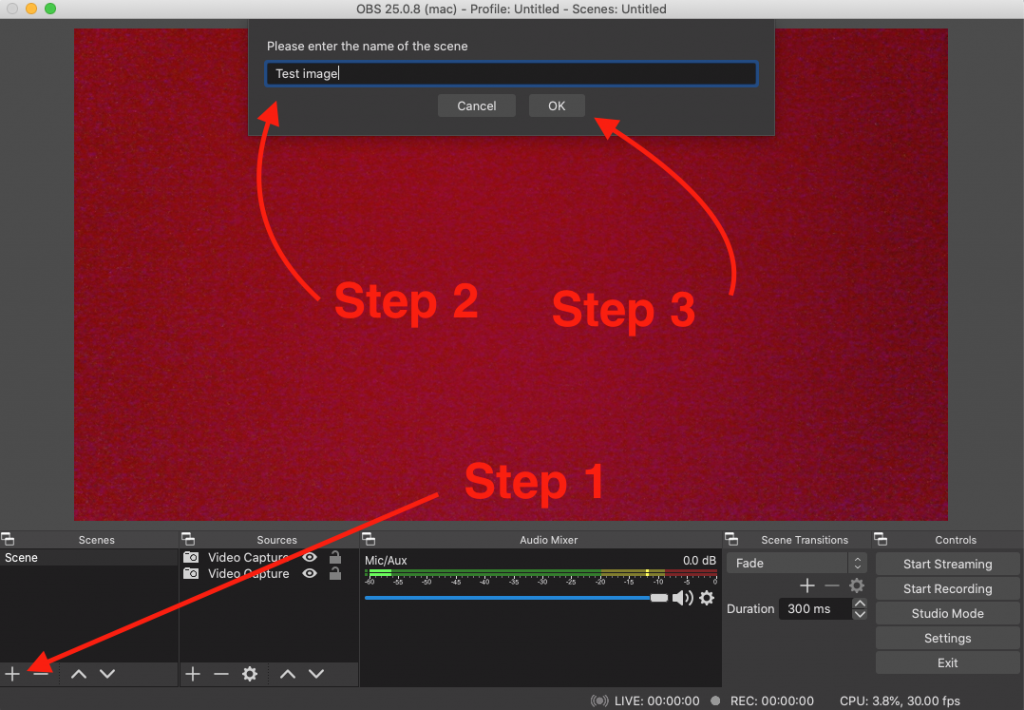
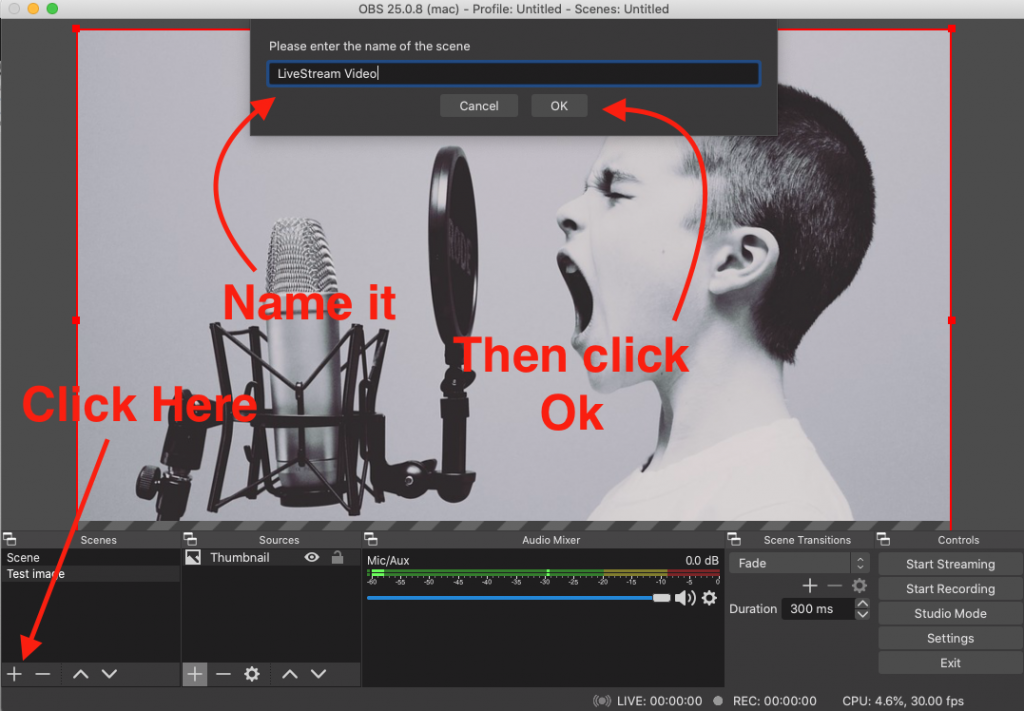
Then you will need to click on the + button on the bottom left under Scenes. It will then give you the option to name your image. Once you do that you just need to hit Ok.
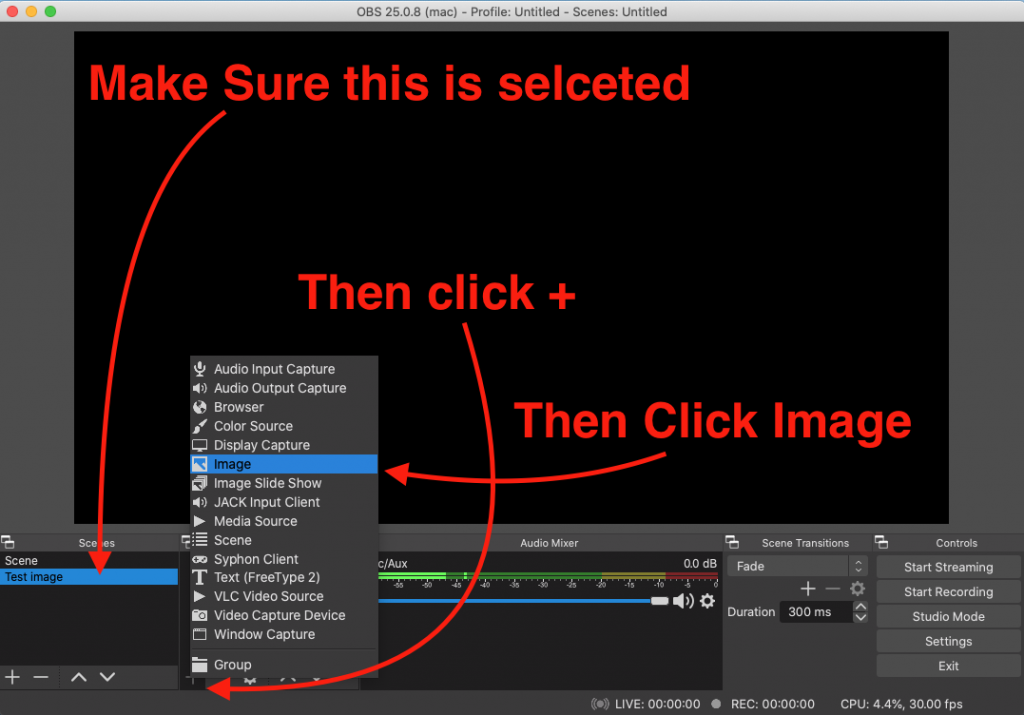
Then you will need to make sure that image is selected and then hit the + button in the Sources box to the right of that and click on Image.
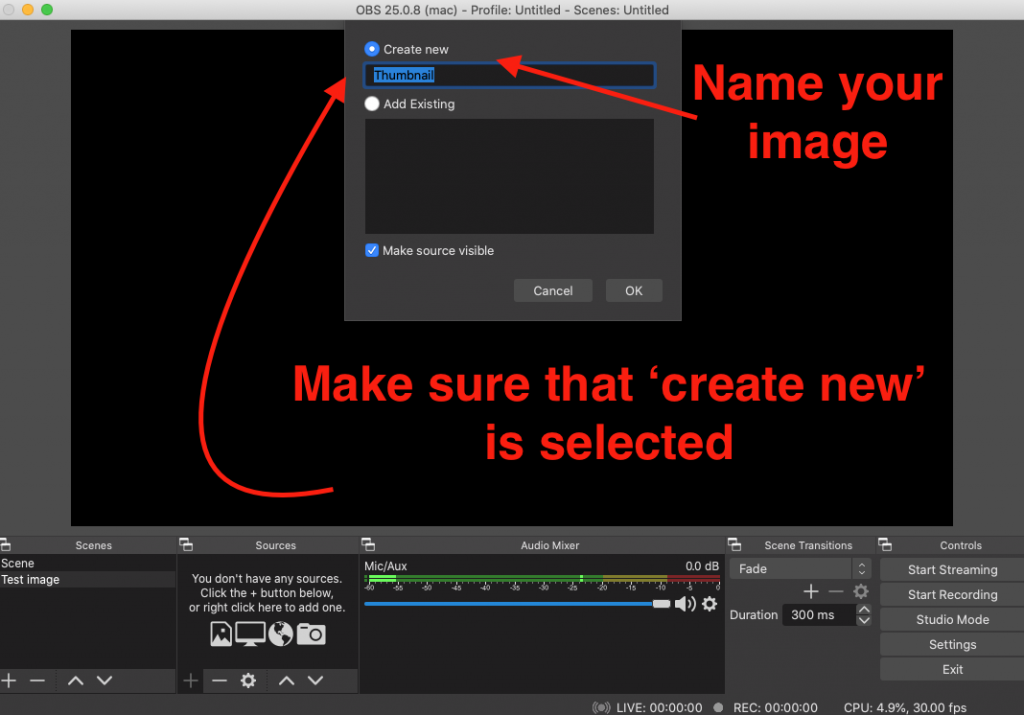
Then you will need to make sure that Create New is selected and that your image is named. Then click Ok.
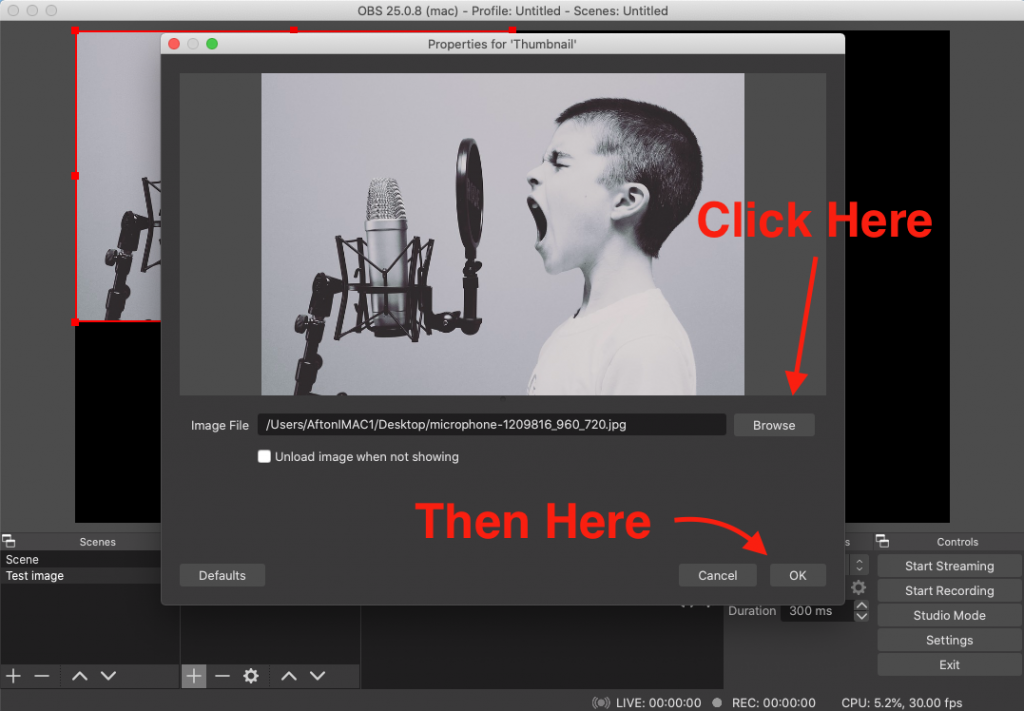
Next you will need to click on Browse to find the image that you would like to use and then click Ok.
Video Setup
Starting off you will just click on the + button in the bottom left corner under Scenes. Then you will need to name the file and hit Okay.
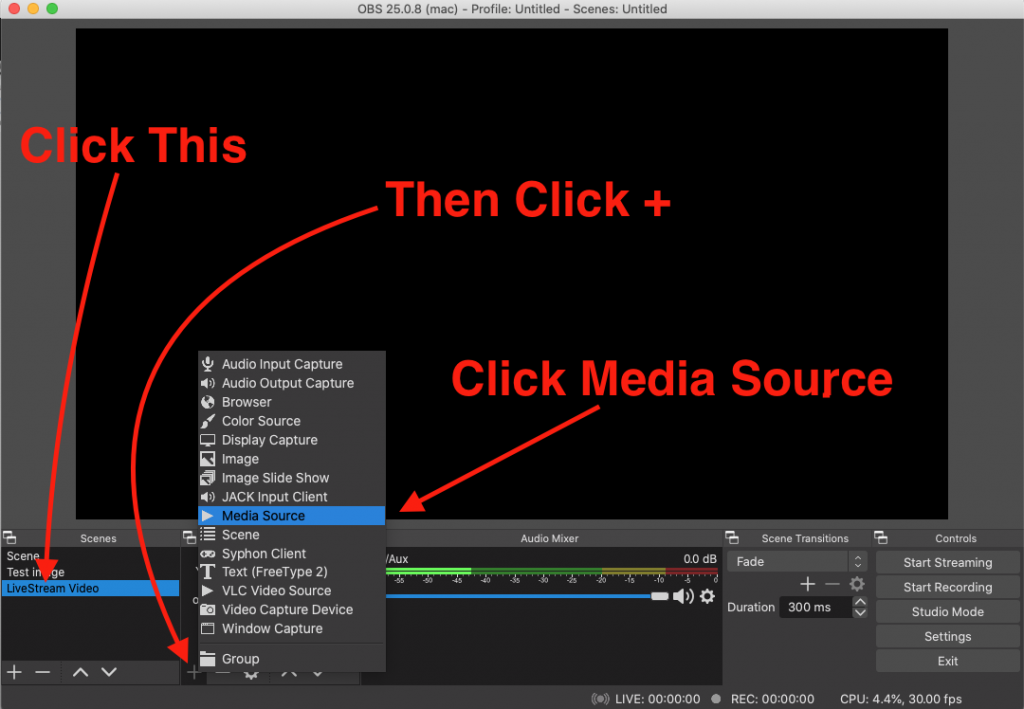
Next you will need to make sure that you have your Scene selected (in this case mine is called ‘LiveStream Video’. Then hit on the + button in the Sources section. Then click on Media Source.
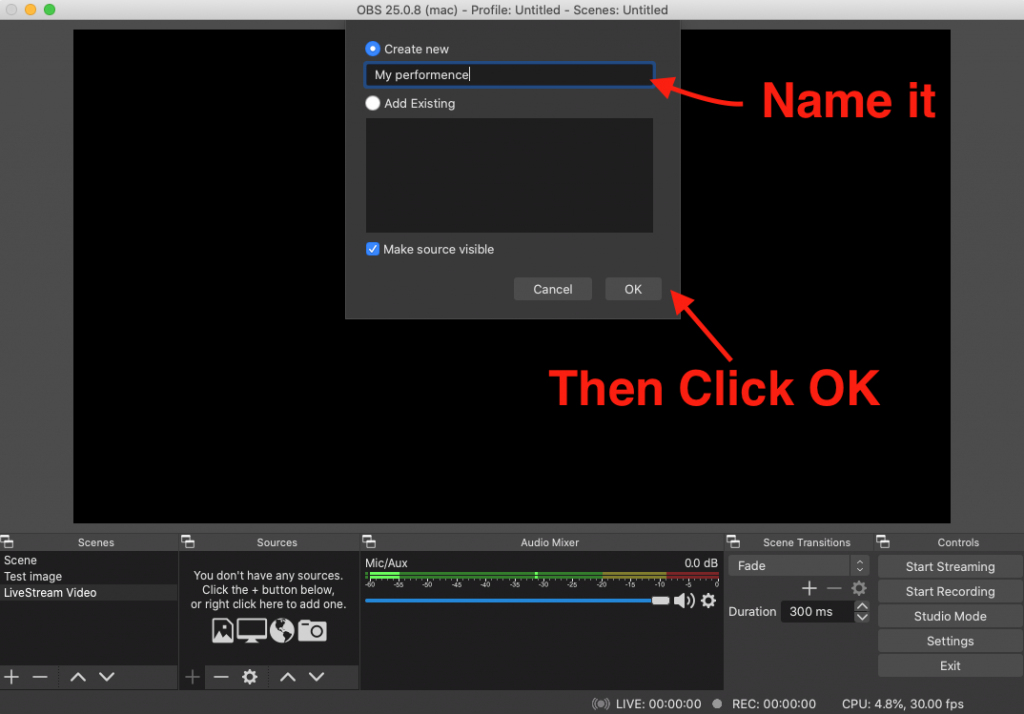
Then you just need to name the file and click Ok.
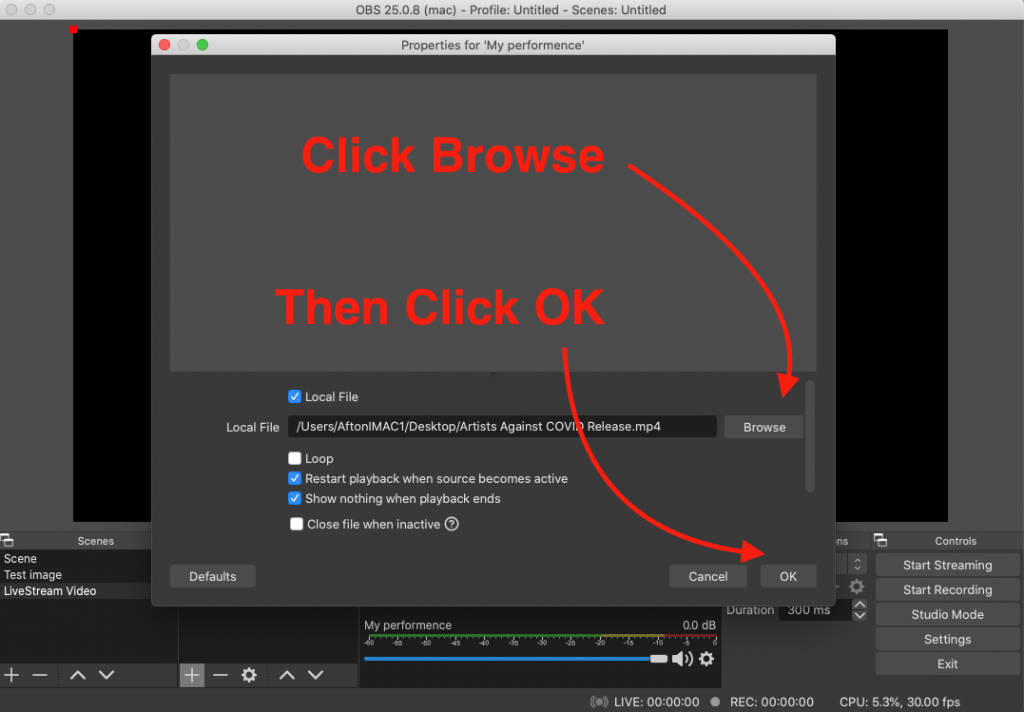
Next you will need click on Browse and locate the pre recorded video that you want to be played on your LiveStream. Once you find it just hit Ok.
Finally you will just need to click on the Video Scene in order for it to play. In this case mine is called ‘Livestream Video’. Once you click that the video will start. So once you have your livestream all setup and streaming you would just click on the video file for it to begin playing for your audience.

Video Tutorial
You can also watch the below video to walk you through the process. Skip to 2:10 in the video for the start of the tutorial.
LiveStream: Mac Users Only. Send DAW Master Audio Output to OBS with BlackHole
The First Steps
- Make sure that your programs are all up to date to ensure complete compatibility.
- Make sure that you have Blackhole downloaded. (If you do not make sure to head HERE for the full article on how to download and install it.)
Setting Up Master Output
Head to Applications -> Utilities -> Audio MIDI Setup (NOTE: If your Audio Devices window is not visible, click Window -> Show Audio Devices)
Then you will need to Right Click on the Blackhole 16ch item and select Use This Device For Sound Output. (See image below for reference)
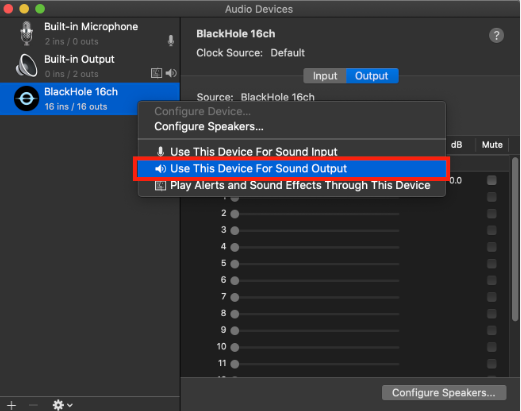
If you selected correctly you should see a speaker icon right next to BlackHole 16ch device.
You will now need to quit Audio MIDI Setup.
Setup DAW Audio
We recommend using Reaper. But, whatever DAW you use, you will need to select BH as the audio driver/interface. This may require creating an aggregate device on a mac:
For additional help, watch this video: https://www.youtube.com/watch?v=NrzcEYzcbXA
The specific menu and buttons to click will be different for every DAW program, so if you need additional help, find a resource specific to the DAW you are familiar with and using. But again, you need to select BlackHole as your audio driver in your DAW. Once that is set up, you can route the output of the DAW to the BlackHole channels. From there you will need to point OBS’s input to the same BH channels you selected for output in your DAW. More on this below.
Setup OBS for Audio
Download and Install OBS. If you have not already done that you can head HERE for the full help article on how to do that.
Once you have it downloaded and open. Click the + button at the bottom of the Sources window in order to add a new Audio Input Capture source.
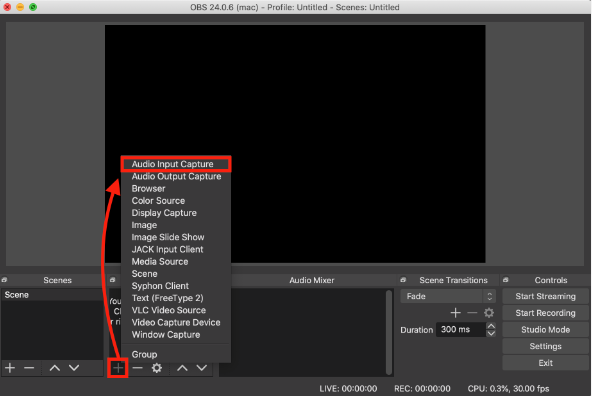
The default settings are just fine, so just click OK. Next select BlackHole 16ch from the device drop down. Then click OK.
Once you have started playing audio (within rekordbox) you will now see activity on the meters in the Audio Mixer within OBS.

Go ahead and adjust the volume to 6.0db (or as needed to get the single track peak levels just dipping in the red).
You should now be all setup to LiveStream!
LiveStream: MAC Users Only. Install BlackHole
Easy Installation Instructions
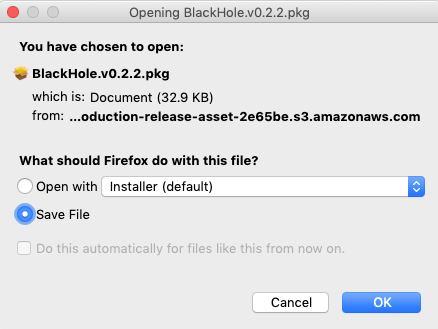
- Download BlackHole HERE
- Close all audio applications that are running.
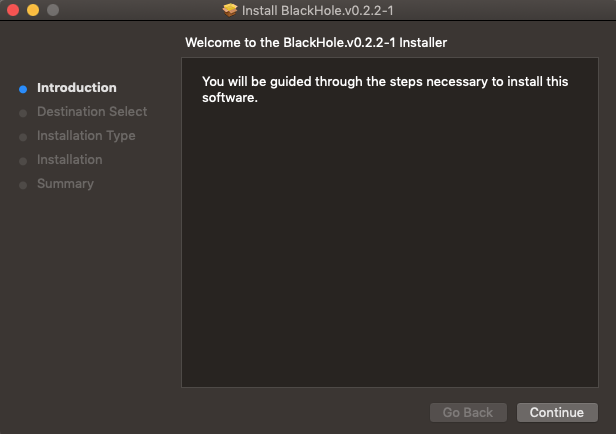
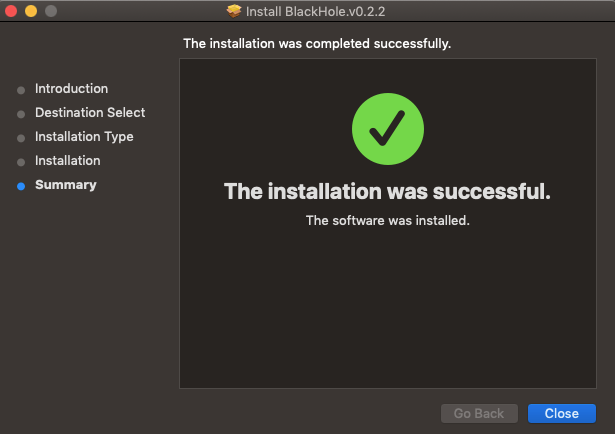
- Open and Install the downloaded Package. (as shown below)
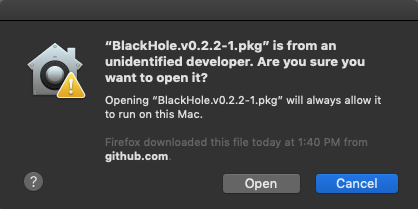
4. Next you will need to restart your computer to finish the installation.
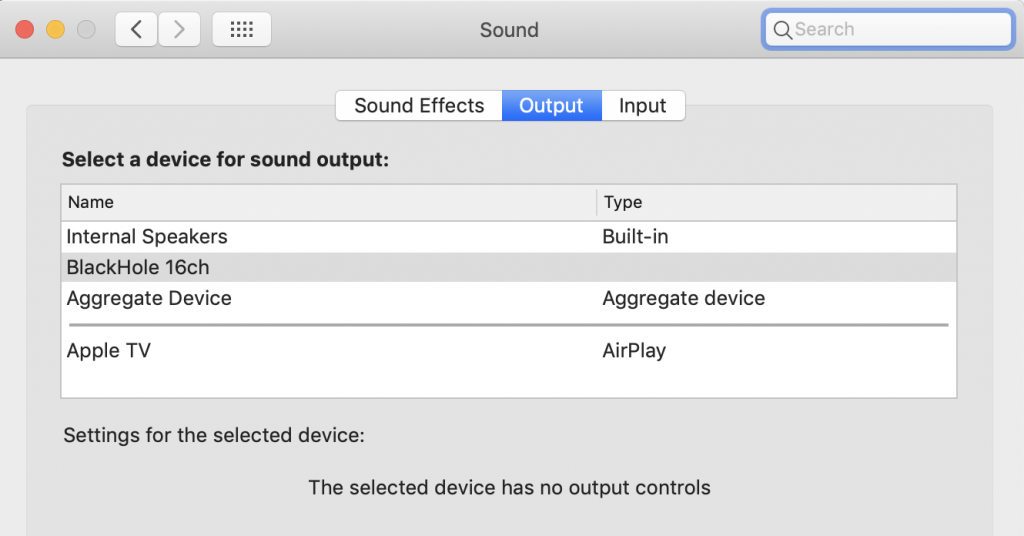
5. BlackHole is not a regular app that you can open. To Find it make sure to go to System Preferences -> then click Sound. (as shown below)
After installing BH successfully, you will need to select BH as your audio driver in your DAW. Click HERE for additional instructions!
LiveStream: Frequently Asked Questions
Frequently Asked Questions
For Artists
How do I sign up for a LiveStream?
In order to sign up for a livestream you can simply head to MYAFTON and create an account. Once you are signed up just click on “Create LiveStream” on the top toolbar.
How Does Payment work for LiveStream?
Here at Afton we are very proud of our pay scale for LiveSteam shows! It can be found during the setup process when you book a LiveSteam. For more info you can also checkout our help article about payment HERE.
How much is it to LiveStream?
Our booking services are completely free to artists!
Can I choose my own ticket price?
Yes the ticket price is chosen by the artist that is performing.
Can I have a soundcheck before my performance?
Yes of course! Before your LiveSteam we have a built in Tech Rider that walks you through the process and one of the main steps is the Sound Check.
I am not very tech savvy. Is the LiveSteam easy to figure out?
Yes we make the process as easy as can be. We have a ton of help articles that can get you through any issues that you may have during the process.
Can I message my fans during a LiveSteam?
Yes we have a built in messenger for the artist and the fans. Fans can even tip the artist during the performance if they so desire.
Can I use a pre recorded video for my LiveStream?
Yes you are able to use a pre recorded video if you so desire. For full instructions on how to set that up just head HERE.
For Fans
Where do I watch a LiveSteam?
You can purchase a ticket to any upcoming LiveSteam shows over by clicking HERE. From there you can watch the stream on many different devices.
How do I access my LiveSteam tickets?
In order to watch the LiveSteam that you bought a ticket for you can either check your email for the direct ticket link OR you can head to Afton Shows and click on your account to access the ticket. If you need further help you can check out our help article HERE.
Can I watch a LiveSteam from my TV?
Yes you can! You we have help articles that show you how to stream from an Android device to your TV. OR from an Apple device to your TV.
Can I get a refund on my ticket?
All sales are final once purchased as discussed in our refund policy. For further info you can read over our policy HERE.
What if I cannot find my ticket(s) in my email?
That is okay you can simply login to your Afton Shows account and access the tickets from there. If you need some more help check out our article HERE.
I am still having issues who can I get in contact with?
We are here to help! If you have further questions just reach out to your Afton booking rep (if you have one) or email Booking@Myafton.com.
LiveStream: Performance Tips & Ideas

Performance Tips & Ideas
In this help article we will be going over some great tips that can help you improve the overall quality of your LiveStream performance. We hope that you can use them for your upcoming LiveStream event.
BackGround
Make sure to make the background of your performance stand out to make sure your show more enticing for fans! You can do this with a few methods.
- Create a backdrop for your performance that ties into the theme of your show.
- If you are able to rent or buy (or if you already have one) you could use a projector that displays some affects behind you for your performance.
- A lot of artists have put on great shows by having Hype men/women or dancers that help stregthen their show. You could use some choreographed dancers in the background for some of your songs or just have a Hype men/women there to help you out with some of your songs.
- You could have your setlist shown in the background to help fans anticipation level rise as they get closer to some of their personal favorite songs of yours.
Live Q/A
Either before or after your LiveStream set you could have a live Q/A with your fans. This is a great way to make the shows more personal for fans. Sometimes fans will ask specific questions about the meaning of songs or how you wrote a specific song. Depending on how personal you want to get with your fans this can bring them closer to you as an artist as it will help them connect with songs if they relate to the fan.
You could also have a Q/A that is geared more towards asking the fans which songs they would like to hear in your LiveStream set. Most artists have more songs ready to perform then they had initially prepared to perform for their show so you could then alter your set to reflect some more songs that fans specifically ask for.
Live Set Sneak Peak
A lot of aritsts will actually use a livestream as a way to show fans what their new set will sound like when they go on tour. This is a great way to give fans a “sneak peak” at what is to come with their live show.
At a time when no shows are not happening (because of the social distancing rules that come with COVID-19) and artists are having to wait to go on tour this makes the live set sneak peak an even better option. It keeps the fans up to date on your music and where you are as an artist/band.
Album Listening Party
Another cool option for your show is to advertise it as a listening party once your set has ended. So after your show is over you can play some of your new songs that are going to be released for your fans so they can get a taste of the new songs.
This is a great way to get your music out to your fans before they are released. Sometimes labels or companies might have your music releases delayed which means your fans can’t listen to them. However this is a great way to get around that so your fans will be able to listen to some of the new tracks before they are released.
We hope that you can use some of these ideas and tips to help improve your LiveStream performance.
LiveStream: Options on making it the highest quality
Making it The Highest Quality
In this article we will go over some tips on how to create the highest quality of livestream for both for free and with some investment.
1. Built-in Microphone & WebCam
All you really need for this one is a laptop or a desktop. This setup is great for performers who want to keep things simple by just opening up their laptop, doing a quick soundcheck and puting on a great show for their fans. This takes out the hassle of setting up a ton of gear. All though the sound can sometimes not be 100% a lot of fans will apprciate it because it creates a more real sound that is not as perfected.
To use this method you simply just grab a computer and open it up. Next you will need to head over to the source menu which usually brings up a couple drop down menus. You then will just click ‘built-in webcam’ for the video and ‘built in microphone’ for the audio. Once you have selected both you are all set!
2. External Webcam & Microphone
The next step up from the previous method is using both an external Microphone and Webcam. This will help to improve the sound and video quality a bit for your performance. With both of these being used you can pair them with an audio interface to navigate the sound to your computer for an even better experience for the fans.
If you already have an audio mixer at your disposal you can use it to easily bring in more than one audio source for your show. You will need to make sure that you have the correct cables that are able to bring the audio from the mixer to your computer.
3. HD Video Camera & External Audio Mixer
If you find that one of the above two options is not going to cut it for your show don’t worry we have a couple others to go through. One of them is by using an HD video camera to help improve the over all quality of your stream experience. In order to do this you will need some kind of desktop client software. A couple free options are; Adobe Flash Media Live Encoder, ShadowPlay, or AirParrot 2. There are also some paid options as well like Wirecast. Some people have found those to be better and it could be worth it depending on how often you stream.
You will also need a way to get your HD camera connected to your computer. A couple options for this are either an analog-to digital video converter or a Firewire connection. Using a cable like that you would need to couple it with an audio setup that was mentioned in the previous tip.
4. More Than One Camera
A final option that you can use is more than one camera for your performance. This can give the fans the feeling of being a little bit closer to the artist as they can see more than one angle of the performance. If you are able to get your hand on a Tricaster (a portable live production appliance that is easy to use, affordable and most models are small enough to fit in a backpack) or something similar you are able to setup more than one camera for your show.
This option may be the hardest of the methods mentioned but it will possibly be the most rewarding for fans so they can have a more personal experience for their show. You might be able to find a place that rents out cameras and Tricasters at a reasonable price so you don’t have to fully commit to purchasing the products.
We hope that you found some of these methods useful for your LiveStream performance. And if you have any questions about any of the methods just email Booking@Myafton.com and we can try to help you through the process!
LiveStream: How Does Payment Work?
Artist Payment Amount (LiveStream Only)
A common question among artists is how does your pay structure work? Even though a lot of artists have booked shows with us and are aware of our pay scale for local shows, the pay scale for Afton LiveStream shows is setup differently. So we will dive in deeper to go over just how that process works.
From the research that we have done our payout is higher than all the other streaming services that we have found. Some platforms take 50% of the profit and others start payout at 60% for the artist. Here at Afton we start the payout at 70% when 6+ tickets have been sold for the show. And it only goes up from there.
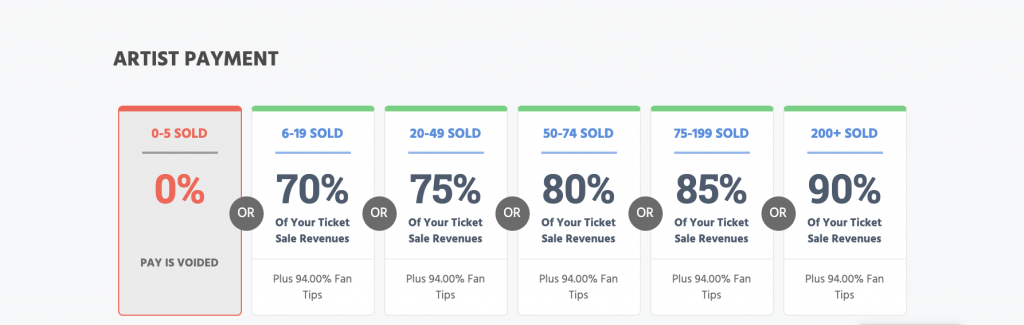
As you can see from the image above our payout starts at 70% when only 6 tickets are sold and goes all the way up to a 90% payout for the artist.
Payment Method
We will send it via EMAIL as an E-Check. It is issued through deluxe.com which is the e-check platform for Deluxe Corporation (the 2nd largest check printer in the United States).
Your payment will only be issued if the artist successfully completes their LiveStream performance. Payout will be issued within 7-10 business days of the performance. And all the checks are valid for 90 days from the issue date.
If you have any further questions please reach out to your booking rep or email Booking@Myafton.com and we can get your questions answered.
Categories
- Artist Payment
- Fan: LiveStream Setup Help
- General Show Terms & Details
- How Afton Promotes
- How To Sign Up For An Afton Account
- How to Use Promo Codes
- MyAfton Design Tool
- MyAfton Platform: Account Help
- Not Getting Our Emails?
- Open Dates & Days of Week
- Perks
- Refund Policy
- Ticket Questions
- Time Slot Policy & Set Lengths
- Turning Booking On/Off
- Weekly Check Ins
- Weekly Goals for Confirmed Bands